Table of Contents
We talked about some of the important basic tweaks that would allow you to increase performance and battery life of your Windows 10 computer in the first part of this article.
This section of the guide will deal with two of the most impactful tweaks you can make on a computer: undervolting and over/underclocking.
As I mentioned in the first section, these tweaks have increased the battery life of my QHD+ Razer Blade 2015 from 4 hours to 6, increased my 3dmark11 score by about 10%, and reduced thermals and noise emissions.
On the other hand, this guide does not address the hardware-level changes you can make to further tweak your laptop, like re-pasting your CPU/GPU with a high-quality thermal compound, upgrading your SSD, etc, but if you’re interested in these topics, drop me a line in the comments section at the end of the post and I’ll address them in the future.
CPU Undervolting
What is “undervolting”? Undervolting means to reduce the voltage a component receives.
Why does this matter? Lowering the voltage, even by relatively small amounts, reduces the power draw of the components (in this case, the CPU) and thus decreases the heat generated while increasing battery life.
What’s the catch? Actually, there is little to no risk involved. The worst thing that can happen is that if you reduce the voltage too much, the computer may crash, and you will have to decrease your undervolt (that is, give a little more voltage back).
Although I’ve never heard of anyone’s computer ever being damaged by a software undervolt, please note that we are is in no way liable for any strange act of God or transdimensional undersea being that may damage your computer if you proceed. Again, although this is a safe process with little to no chance to damage any components (in fact, it should increase their longevity, as they will run cooler), proceed at your own risk!
What you need
ThrottleStop! Head over to The ThrottleStop Guide and get the latest version from the first post. Unclewebb is the developer, who has been working on ThrottleStop for years now (I’ve been using it for over 5 years, and it’s been in around for quite a bit longer than that) and is still adding features to this day. He is active in the thread and helpful with any issues—just please make sure you’ve searched and read the documentation before asking for help from him.
You’ll also need a program called Prime95 to stress your system and check for stability issues at your new voltages.
Note: Undervolting can also be done with XTU, however due to the performance impact the software/service has while running, plus its many bugs with re-applying/identifying CPU data, I recommend ThrottleStop instead.
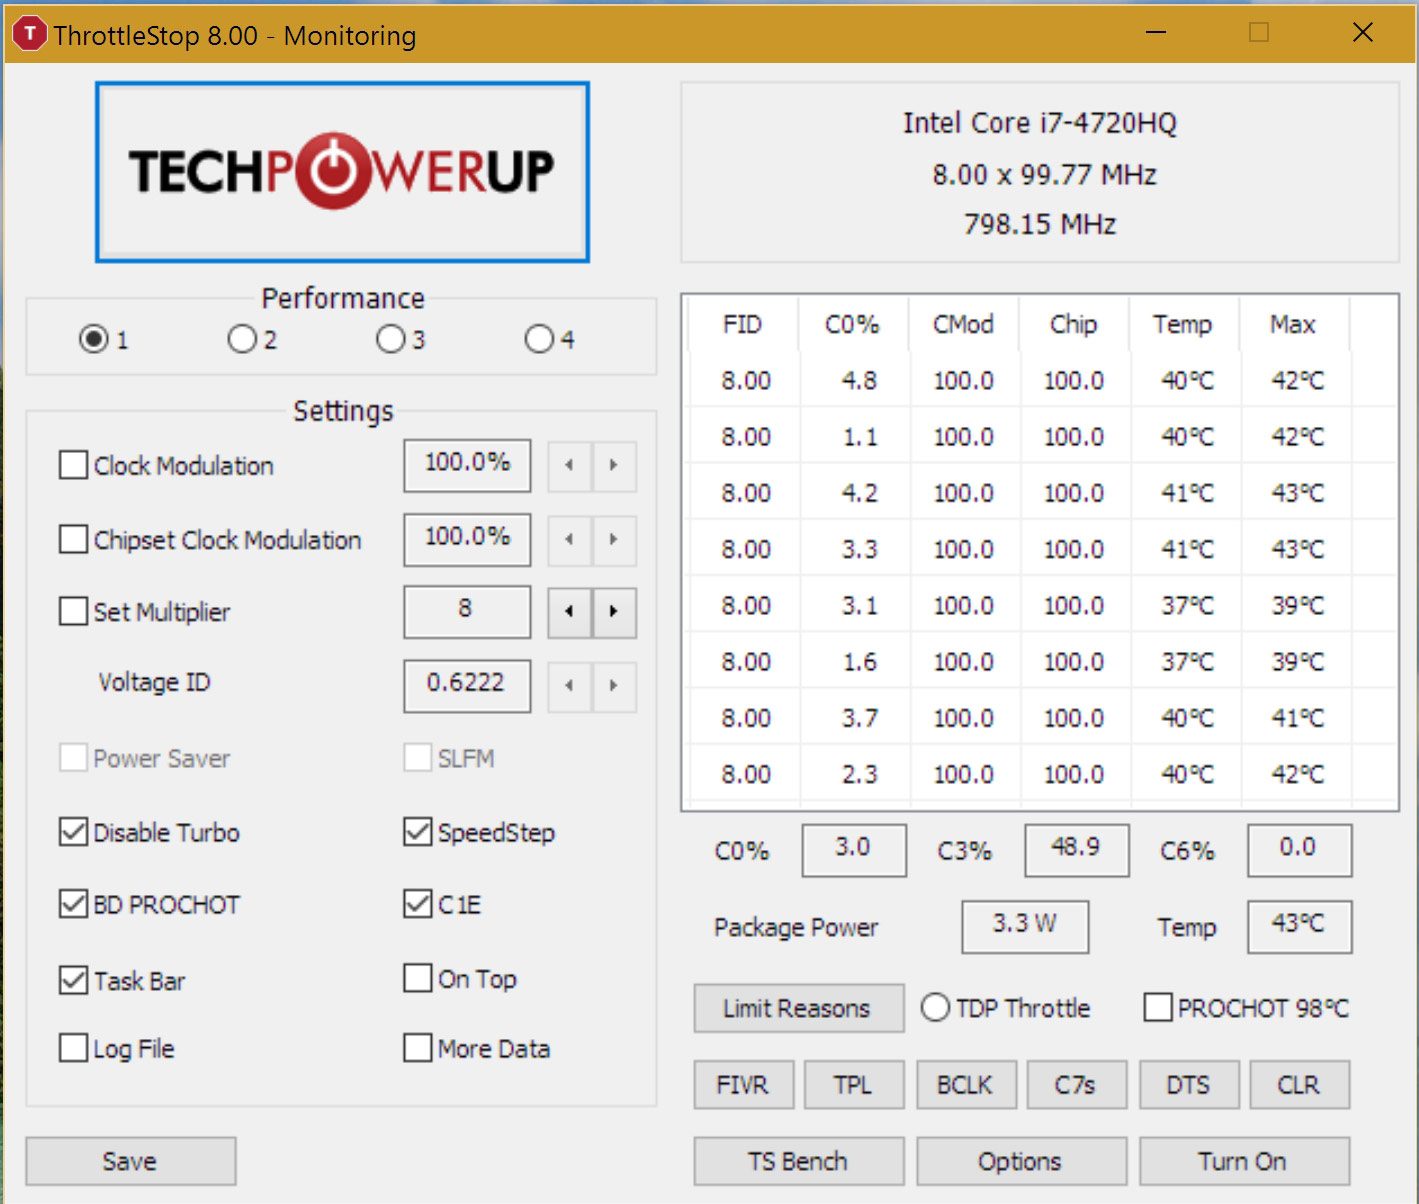
Unzip ThrottleStop to the directory of your choice and run it as an administrator. After clicking “OK” to the disclaimer warning, you should be greeted by the main screen:
Note that my default settings here are not the same as yours, so don’t change your settings to match mine—this is only a reference photo.
Now, these options might seem a little overwhelming and complex, but we’re here to just do a specific thing: undervolt. I will get to the other functions of this software later.
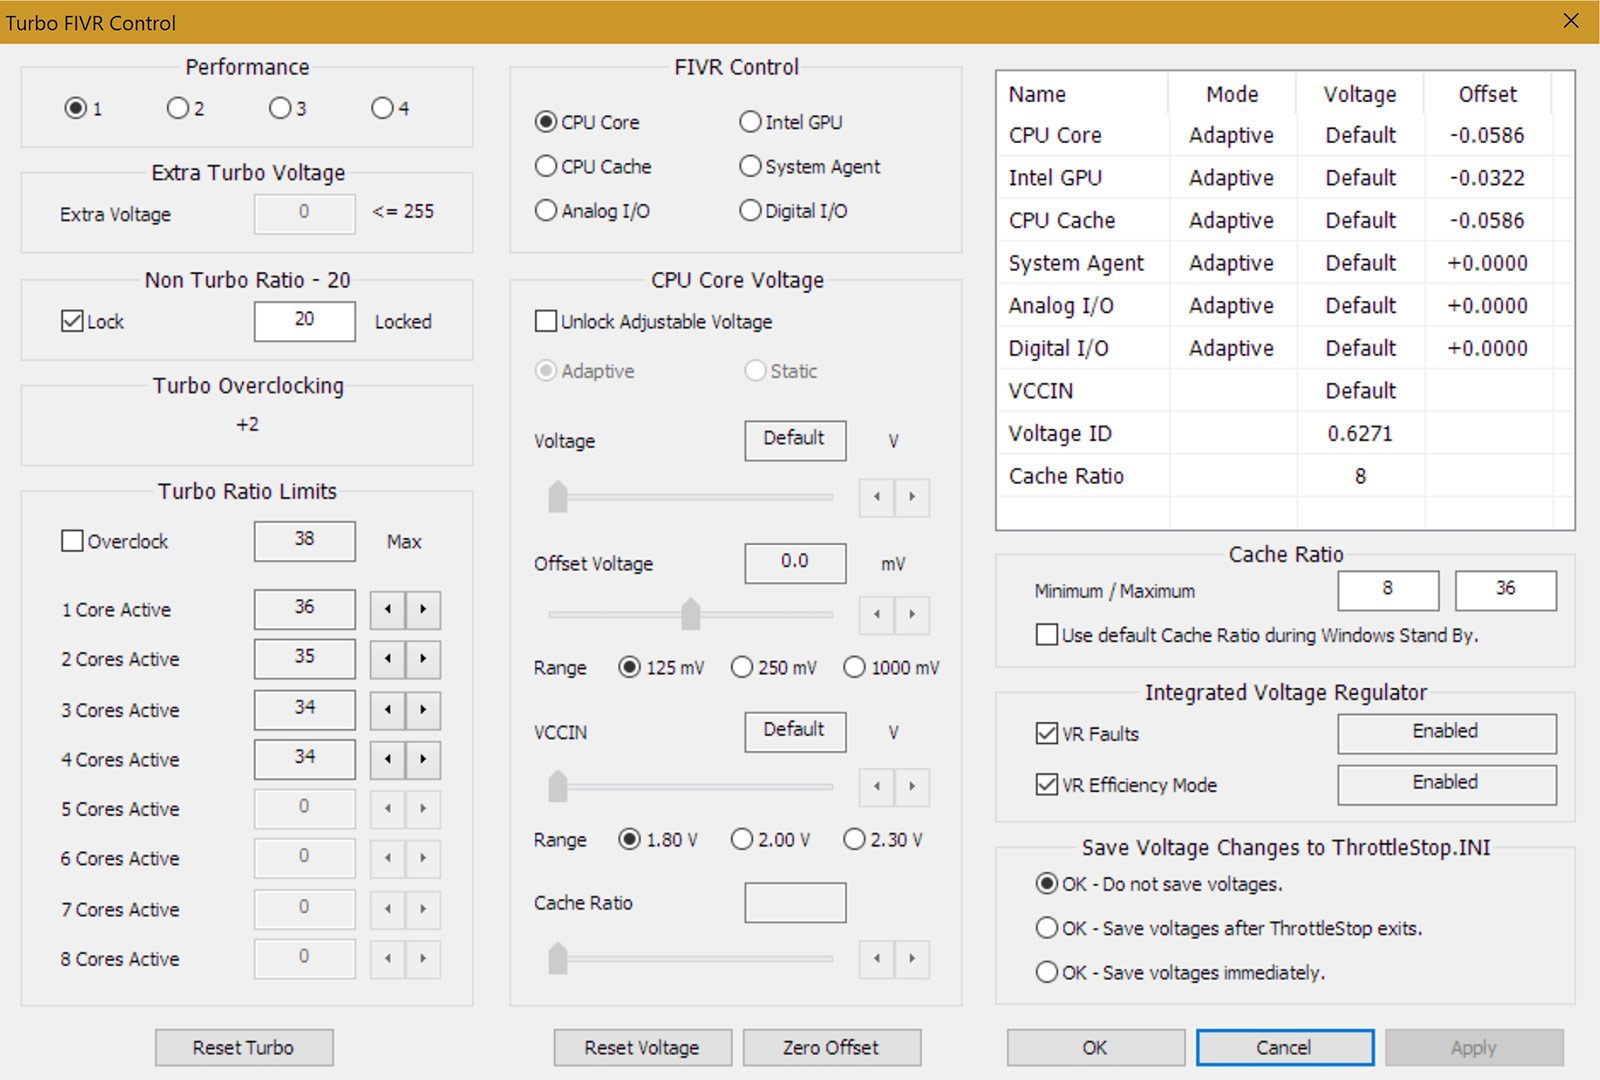
The basics you need to know is that first, ThrottleStop keeps 4 different profiles, which can be selected with the radio buttons numbered 1-4 in the screenshot above. Understand that most changes you make in TS are only for the profile you have selected. Therefore, if you will be using more than 1 profile (and I recommend you do, as I will discuss after we undervolt), you’ll want to set everything for the other profiles as well. Otherwise, when you switch to the other profile, you’ll be back to whatever the default settings were. Still, let’s undervolt first: to get to the undervolting settings, click the “FIVR” button.
Note the radio buttons numbered 1-4 corresponding to the up to 4 profiles TS allows.
Time-saving tip: If you have a popular model/CPU, try googling the name of your computer/CPU along with “undervolt”. See what others have been able to successfully achieve stably and use that as a starting range. Your CPU may be even more capable of undervolting, or less. You will need to fiddle up and down a bit to find a stable undervolt.
This will take a bit of time to get perfect as every chip is different. For example, the Core-i7 4720HQ in my Razer Blade 14” can only handle a -58.6mv offset on CPU and Cache and a -32mv offset on the iGPU. Any more than -60mv and I will get random BSOD restarts. In contrast, on my Core-i5 6300HQ in my XPS 15, I can undervolt up to -125mv on core/cache and -100mv on the Intel GPU.
To start undervolting on this profile, follow the following steps. Remember that you will need to do this for 3 things: CPU Core, CPU Cache, and Intel GPU.
- Tick the “Unlock Adjustable Voltage” box under “CPU Core Voltage”.
- Make sure “Adaptive” is always selected.
- Move the Offset Voltage slider to a modest value, such -50mv.
- Under “Save Voltage Changes to ThrottleStop.ini” set it to Save voltages after ThrottleStop exits. This ensures that if you have a hard crash due to excessive undervolt, those same settings won’t be reapplied automatically.
- Click “Apply”. Write down these numbers, because in the event that it crashes the values will reset to zero.
- Do the same for CPU Cache. CPU and Cache undervolt tolerances are, in my experience, always the same. For the Intel GPU I find that they are generally less undervoltable, so I use more conservative values.
- Use Prime95 or an intensive game for a few hours. Did your computer freeze up or restart at any time? Undervolt 5mv less on each component (i.e. if it froze at -60mv, lower the UV to -55mv) and try again until it’s stable.
- If the system has no issues after a few hours of testing, then go ahead and lower the voltage offset a little more (i.e. if -60mv was stable, try -65mv).
The greater the undervolt, the cooler the CPU will run and the less power it will use. This can lead to temperature drops under full load of anywhere between 5-15C, meaning your computer will be able to operate faster for longer, all the while generating less heat. It’s absolutely worth the effort.
At this point, once you have set up the undervolting, you can use Task Scheduler to start ThrottleStop with your computer and the undervolts will stick. However, if you want to tweak a bit more, there’s quite a few more things that ThrottleStop is capable of, such as…
Using ThrottleStop profiles to keep temperatures and noise down and performance up
Depending on the quality of the design of your computer you may have issues with throttling, heat, fan noise, or maybe all three.
Many, many notebooks are just not designed properly for the components they contain these days. Case in point: I first started using ThrottleStop years ago because of the overpowered but undersized Acer 3830TG, which would throttle from 2.3 GHz down to 800 MHz as a BIOS failsafe after about 10 minutes of gaming. The 13.3-inch chassis and insufficient cooling meant that the CPU would quickly hit 95C, at which point the system would go into emergency measures to reduce the heat. The solution? I used ThrottleStop and its profile abilities to limit the peak clocks of the computer dynamically, based on the temperature of the CPU. By limiting the clocks to 1.8GHz instead of the default 2.3GHz, it was able to play games sustainably without any drop in performance because of the reduction in heat generated.
A more recent example for the need to do this would be the 14-inch powerhouse laptops I reviewed, the P34W v3 and the 14” Razer Blade, which both share the Core-i7 4720HQ CPU and GeForce 970M GPU.
Unchecked, both of these machines ran into issues due to high CPU temperatures. The P34W would have to throttle its GPU and CPU down by about 30% to avoid thermal failsafe shutdown (occurs in most Intel chips at 100C), while the Razer Blade would not throttle, but remains uncomfortably close to its 100C thermal limit and becomes almost too hot to touch.
These types of temperatures are terrible for the longevity of the components, including the GPU, SSD, and especially battery… Not to mention that these kind of temperatures result in your laptop fans sounding like a 747 during takeoff.
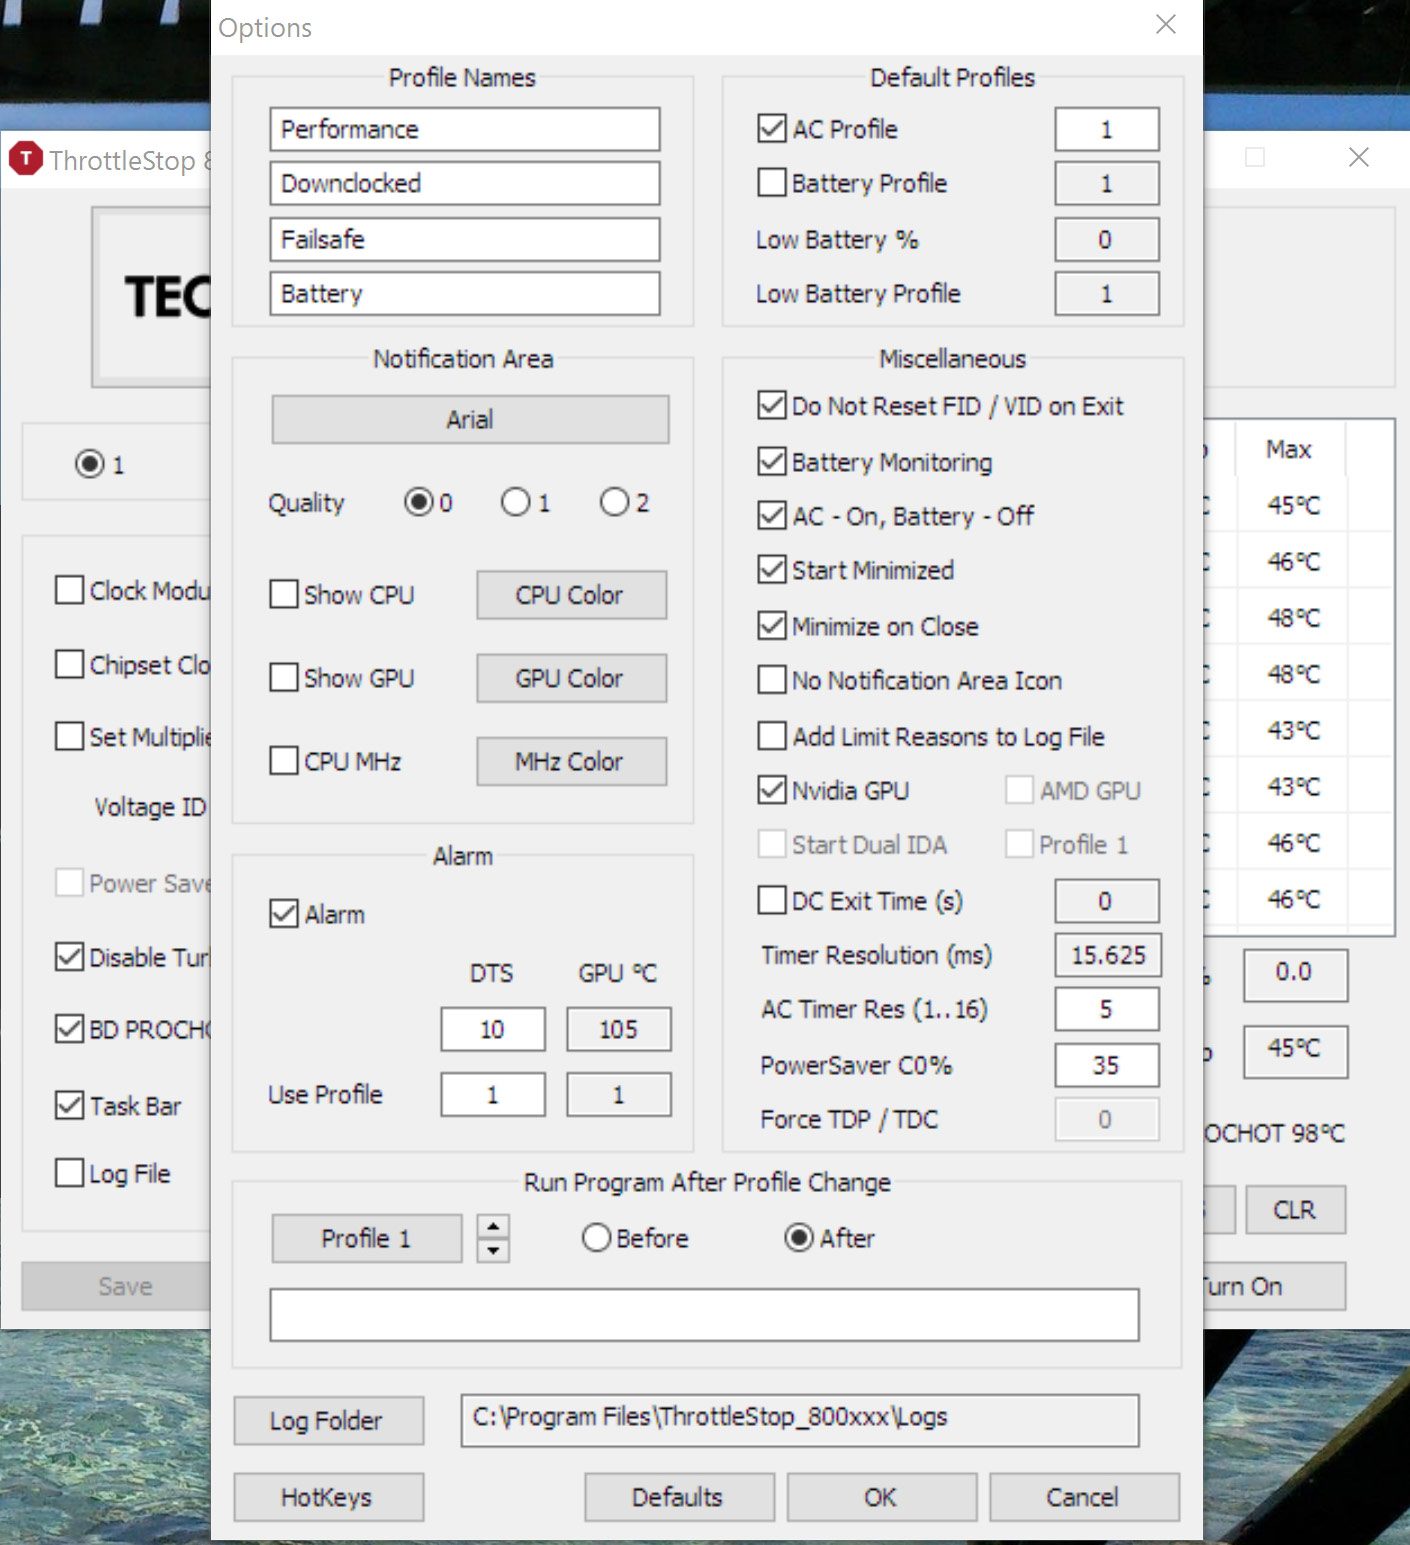
So let’s say you’ve got a hot laptop and you want to keep the temperatures from getting out of hand, or perhaps the fans kick into high past 80C and distract you—you can use ThrottleStop to solve these issues. We’re going to do this by setting up 3 distinct profiles for TS to use, each with different clock settings and different temperature triggers. From the main TS screen, click “options” and you’ll find this window:
Under “Profile Names”, you may consider making “1” the max performance profile, “2” the slightly downclocked profile, and “3” the “oh shit, my PC is melting” profile. You can call them whatever you want, but just remember that you’re setting them up as a descending order of power. Before we can continue, we’re going to need to check the “Nvidia GPU” option, and then restart TS (I am not sure what to do here if you do not have an ATI card.
If the “GPU °C” is greyed out for you, then you’re going to be limited to 2 temperature profiles instead of 3. So, assuming you have an Nvidia card, check the box, quit and restart TS, then come back to the options menu. At this point, the “GPU” box under “Alarm” should no longer be greyed out.
Alarm
Check the “Alarm” box. There are 2 columns. The first column, “DTS”, refers to the number of degrees short of your CPU’s thermal limit to trigger the alarm. For example, on an Intel CPU this will probably be 100C, so setting a “DTS” of 8 means that when your CPU hits 92C it will switch to whatever profile you put under it (in my case, this triggers a switch to profile 2). *Note that we haven’t set our profiles yet and thus switching profiles will have no effect until we do.*
Under the GPU column, the top box is the actual temperature alarm of the dedicated GPU, not the CPU. I set this to 89 as GPUs aren’t designed to run as hot as CPUs, and underneath that, set it to trigger profile 3.
What did we just do, exactly? We set up 2 separate temperature triggers for 2 separate ThrottleStop profiles (which we will create shortly).
Setting a DTS of 8 means that at about 92C, your computer will switch to profile 2, which we will set up to be slightly slower. Setting the GPU of 89C means that if your GPU hits 89C, your computer will switch to profile 3 (which will be the slowest one, designed to reduce temperatures). I set up the profiles like this because modern GPUs like the 970m/980m generally run cooler than modern CPUs. A mobile quad-core CPU is designed to run at 95C without issue, but GPUs tend to run about 10C cooler. Essentially- an 92C (DTS 8) CPU isn’t a big deal in a performance laptop, but an 89C GPU is something we want to avoid.
Default Profiles & Miscellaneous Settings
- Check the box for “AC Profile” and set it to “1”. Set battery profile to 4. Whether you want TS to govern your CPU while on battery is up to you. If you do want to use TS while on battery, don’t forget to setup profile 4 later.
- Check “Do Not Reset FID/VID on Exit”, so that the values TS sets will be kept even if the program is exited.
- Check “Battery Monitoring”.
- Check “Start Minimized”.
- Check “Minimize on Close”.
- Click “OK” to exit the options screen to start setting up our profiles.
Setting up the profiles: Profile 1 (performance)
Let’s start with the main profile, profile 1. This is the profile that your machine will be using by default (whenever you plug into AC, if checked that option). Things I recommend for all profiles are to check “power saver”, “speedstep”, “C1E”, and “BD PROCHOT”. “Power Saver” simply allows your CPU to downclock to a lower-power mode while not in use, while C1E also saves power. Disabling these is essentially the same as forcing the minimum CPU speed to 100% in the Windows power options: it’s a waste of power and creates heat.
In terms of clocks, profile 1 should be the fastest your machine can handle under load while staying within the temperature/noise limits you are comfortable with. If you want max performance, then leave everything else unchecked. Don’t check either of the clock modulation settings or set a multiplier.
The settings we have just set will mean that your computer will run on profile 1 until it hits one of the two temperature alarms we’ve set.
Profile 2: Slight downclock
Profile 2 should be set up the same as profile one with the exception of the multiplier, “disable turbo”, or both.
If you check “disable turbo” on this profile, then it will ensure that your CPU, once it hits a toasty 92C (assuming a value of 8 DTS in the options—you could set this profile to trigger at a more conservative temperature if you like) will disable its turbo and run at its max base clock.
For example, on an i7 4720HQ, turbo will go up to 3.6GHz with a single core, but if you disable the turbo, it will max out at 2.6GHz. This is good because it will keep temperatures down, however, it might be either too conservative for you (it will run cool and could be running faster) or not conservative enough (if temperatures are still getting high without turbo), depending on your system.
If your system still runs above 92C at your clocks on profile #2, then you should use the “set multiplier” function to a lower number. The goal is to find a frequency that your processor can sustain under combined CPU+GPU load where the temperature will not increase above 88C or so. The exact temperature is up to your hardware and your taste, just remember that hotter temperatures mean shorter-lived components.
You can use the built-in tool “TS Bench” to test the temperatures of the CPU, but Prime 95 or your favourite intensive game will be better tests. Just remember, the clocks you choose for this profile should allow your computer to cool off a bit and get away from those broiling 90C+ temperatures that you might reach on your performance profile.
Profile 3: Failsafe
This is the profile that will be triggered if your GPU (which, remember, should be cooler than your CPU) hits the amount you set in the options (89C).
Basically, if your GPU is hitting 89C, then you need to get a cooler, turn on the AC, or downclock your CPU, because whatever cooling solution you have in your laptop is being overloaded. Therefore, profile 3 should be the lowest-clocked of the 3.
I set this to a multiplier of 20 (2.0 GHz with 4 cores) on my Razer Blade, but it depends on your thermals. This profile should be set up so that the most CPU+GPU-intensive tasks could be run on your machine for hours without temperatures hitting 80C.
This is your failsafe profile for your components to take a breather if they really need it, so you want to be conservative. Unless things have gone wrong or you’re gaming in the Sonora Desert, TS should be running on profiles 1 or 2.
Last step: Set up undervolts for all profiles
Remember that the undervolts you set in the FIVR options have only been set for the first profile until now. Just go through and copy the exact same settings to all the profiles you’ll be using. By following this guide until now, you will have reduced CPU temps and power draw, set up thermal profiles, and as a result your computer should be running faster for longer without your computer overheating and throttling itself radically.
So far in part 2 we’ve reduced the power draw and heat of our CPUs by undervolting, and set up a temperature-based profile for ThrottleStop. Now that we’ve lowered the heat strain on the cooling system from the CPU, we can make use of that that extra temperature headroom to overclock the GPU and get even more performance.
Overclocking with Nvidia Inspector
We just went through a lot of trouble to reduce temperatures, so why are we now overclocking? Well, the reduced heat from your CPU means that the cooling system can work more effectively with the GPU.
Most laptops have a dual-fan cooling solution, but the heat created by one component (usually the CPU) will spread to the other component (the GPU), resulting in poorer performance of both. The GPU is ultimately more important for gaming performance than the CPU, and so increasing its core/memory clocks will give a higher boost in performance with less temperature increase than increasing your CPU clocks.
A note on risk—a slight overclock is pretty safe and shouldn’t affect the life of your card much. Generally, if you try to overclock too much, the worst that will happen is that you’ll get crashes or visual artifacts. If these occur, then reduce your clocks and try again. However, be safe and be conservative. These days, the major performance indicator for GPUs is not the clock speed but the number of CUDA cores. This isn’t something you can change, but by increasing the clocks you can generally get a free ~10% performance boost—and who doesn’t like free?
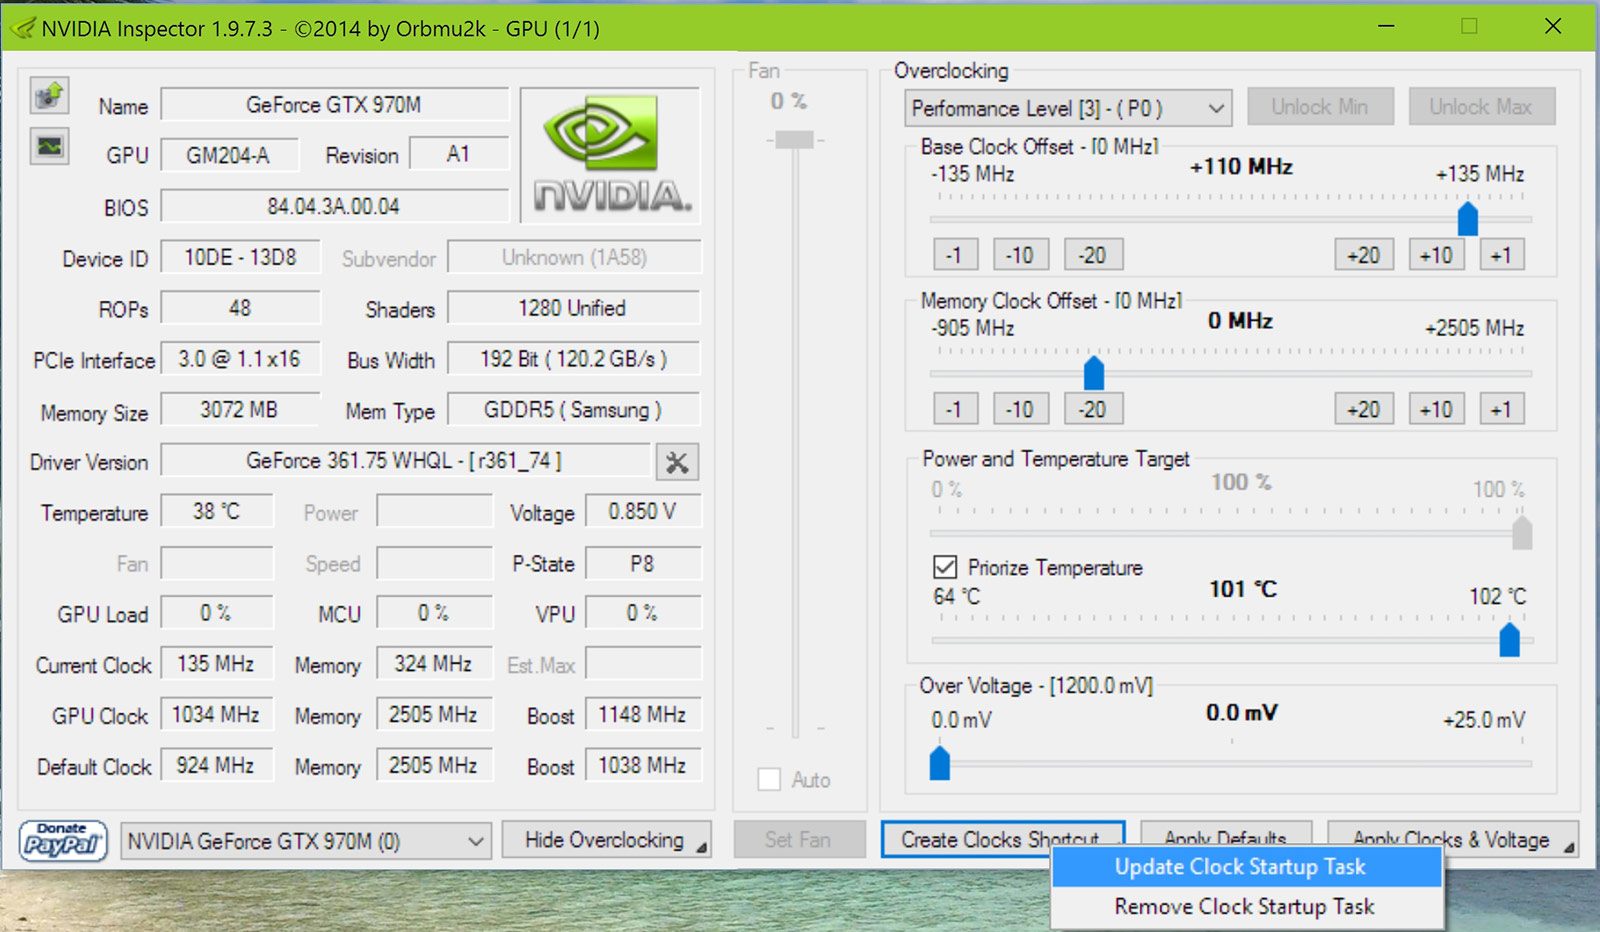
Here’s what you’ll need: NVIDIA Inspector and FurMark. To my knowledge, there is no lighter-weight set-and-forget GPU overclocking app for Windows. Download and extract nvidiainspector.exe to the directory of your choice. Open it and you’ll see a screen identifying your CPU with various statistics. On the lower-right there is a button to show overclocking options. Click this button and accept the dialogue. You should now see a screen like below:
As with undervolting, it’s a good idea to google search your video card/laptop model combination + “overclock”. This will give you an idea of what kind of range you can expect. I found the average overclock for the core of my 970m to be +140Mhz and the average memory overclock to be +400Mhz. As I don’t want to stress such an important component too much, I went with +110MHz on the core and +270MHz on the memory. When you’re ready to test, click “Apply Clocks & Voltage”. Do not exit Nvidia inspector yet.
As with undervolting, you need to tests stability and temperatures. Use FurMark to stress your system for a few minutes and check for any visual artifacting (if yes, then reduce your memory clocks) or crashes (reduce your core clock). Keep an eye on your temperatures with ThrottleStop as well.
Once you have found clocks that work for you, you’ll want to make them stick. The manual way is to left-click on “Create Clocks Shortcut” and create a shortcut that will apply these clocks to your GPU whenever you run it. However, there is an automatic way to apply these clocks at startup, on resume from sleep, and so on. This will take a little finesse with the Task Scheduler:
- Right-click “Create Clocks Shortcut” and select “Update Clock Startup Task”. This will make it so your computer will automatically set these clocks on startup via the Task Scheduler. However, these clocks tend to get reset upon resume from hibernation/sleep, so we’ll want to fix that.
- Open Task Scheduler
- Expand “Task Scheduler Library”. You should see a folder called “nvidiainspector”. This is the startup task that we’ve just created with Nvidia Inspector.
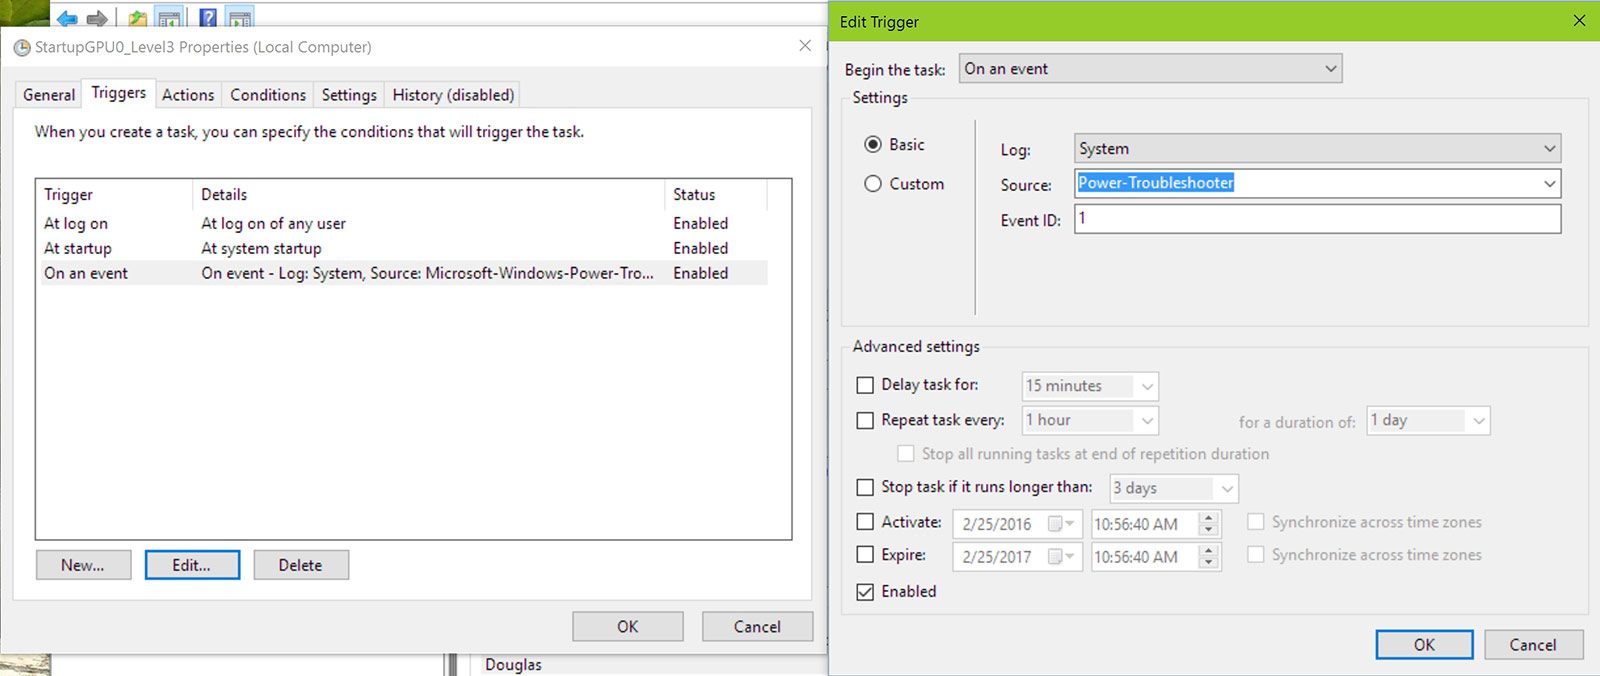
- Double-click on this task and go to the “Triggers” tab.
- Create a new trigger as shown:
- Click “OK”!
Now you’re truly done. Your clocks will be set upon startup/login or on resume from sleep.
Summary
In the first part of this guide we went over some general power-saving tweaks, hopefully extending your battery life and making you more productive.
In the second part of this guide I walked you through undervolting your CPU and setting-up different performance profiles based on temperatures with ThrottleStop.
Lastly, we used NVIDIA Inspector to set a GPU overclock, then used Task Scheduler to ensure the clocks are applied.
Although it seems like a lot, we’ve actually only explored a few of the myriad of possibilities with these software. We’ve decreased heat, noise, and power consumption while increasing performance with software—but there is another world out there of hardware-level changes you can make to further tweak your laptop.
Consider re-pasting your CPU/GPU with a high-quality thermal compound, upgrading your SSD, or, if you have a TB3 connector, attaching an external GPU. If these topics are popular, I’ll be sure to write more on them in the future.
Lastly, please leave a message in the comments if you found this guide useful or are having difficulty executing or understanding a step. The second half of this guide is quite complicated and I’m sure I have not done as good a job of explaining or demonstrating some tweaks.
I will try to keep this guide as up-to-date and helpful as possible. Thanks for reading!









Makyura
March 4, 2016 at 8:05 am
Followed this guide on my Razer Blade 2015, worked GREAT!
Here’s the report:
-61 mV to both CPU Parameters
-32 mV to iGPU
+125 MHz to dGPU Core
+ 280 MHz to dGPU Memory Clock
Throttlestop profiles:
1) Standard, x26 multiplier and turbo on
2) kicks in at a CPU temp of 90° C, x24 and turbo off
3) kicks in at a dGPU temp of 89° C, x22 and turbo off
-1hour long prime 95 test didn’t bring it over 90° C
– 10′ long prime95+furmark brought CPU to 95° and dGPU to 70° top
-1 hour long Star Wars Battlefront session, everything on ultra at FHD with rocksolid 60 Fps brought CPU to 92 ° C and dGPU to 82° C.
Thank you!
sarsaur
May 31, 2016 at 8:53 pm
Awesome and very helpful guide, thanks :)
Lucifer1945
June 7, 2016 at 9:38 am
I noticed when it does throttle, it seems to have control over increments. Id just soon wish to overclock it outside the 100mhz multiplier, maybe 50mhz and be done with it. Is there a way to do this? Contact me here please, ill probably never check this email for a reply specifically. I got it almost where I want it maxing out at 91C, Id prefer a mid 80’s…………. if I cant have the desirable intel 72.xx guideline to avoid degredation. thanks
Douglas Black
June 7, 2016 at 9:42 am
It can’t throttle beyond 100mhz because the CPU speed is calculated in terms of whole-number multipliers of the FSB. If you would like to pay me as your personal tech-support, then I’d be happy to go out of my way to contact you via email or your facebook. ;)
AD
February 22, 2019 at 4:49 pm
What was the impact on performance and peak. And also how much longer it was able to hold peak performance as compared to stock
sp
June 27, 2016 at 4:39 am
Thanks for this superb primer to undervolting and overclocking!
Do you have a view on undervolting the GPU on your 9550?
Douglas Black
June 27, 2016 at 4:52 am
Unfortunately, it is not possible to undervolt a mobile gpu at the moment. They are locked.
stephane
July 14, 2016 at 12:15 pm
Hello,
Was undervolting with TS my 9550.
-0.170 for CPU core & cache cache
-0.125 for intel GPU
I noticed the folowing in the tubo FIVR contol window
In the up right corner, the white window shows the righ values (-0.170 & -0.125)
In the CPU core voltage window/offset voltage, the offset voltage stick on range 125ml and shows a value at 125mv. I did the change several time and save but when I reopen TS it reverse at 125..
Any suggestion?
Douglas Black
July 14, 2016 at 12:21 pm
Sounds like another program is wrestling control of the voltages. Do you have xtu installed, by any chance? If it isn’t, then maybe check “apply settings immediately” and test out different values. Could even delete ts.ini, shut down, boot up, and start from scratch
Stephane
July 14, 2016 at 8:58 pm
no xtu on it..just the program from Dell
Stephane
July 14, 2016 at 10:11 pm
By the way, I was undervolting my P34w v3 as well with TS and have the same issue that I do have with the XPS 9550. (I used to have xtu but uninstaled it with revo)
I noticed also in FIVR/turbo overclocking I do have “+2” even in mode 2 where I have the turbo disabled..
Douglas Black
July 14, 2016 at 11:43 pm
That’s strange. Back up your throttlestop.ini, shut down (not restart) then boot again and see what happens. You might try making a post in the ThrottleStop guide thread on notebookreview. Unclewebb may be able to help you more
Mike Gray
August 5, 2016 at 7:47 pm
Thanks so much! One of the big reasons I bought my Dell XPS 15 9550 was to have a work-oriented latop that I can ALSO use for a spot of gaming when I’m on vacation, away from my desktop. I was terribly disappointed when I actually started playing a new total conversion mod for Skyrim called Enderal and couldn’t play for more than 10 minutes without the game turning into a howling, stuttering mess.
For now, I’ve setup a simple -150mv on my CPU, and it’s like night and day.
One question: Is there any reason not to copy a link to throttlestop into my startup folder (shell:startup in Win10)?
Also: I’d enjoy hearing a bit more from your perspective about replacing thermal paste and pads. I’ve found some stuff in forums (including tutorial pictures), but more info never hurts!
Douglas Black
August 6, 2016 at 2:45 am
Yes, always have TS start-up with your computer.
YES, definitely replace the thermal paste and fix the VRAM pad. With UV + repasting/fixing the non-touching pad, I was getting max 78C on the CPU (turbo always on) and max 83C on the GPU after a couple hours of gaming.
ggggg
August 19, 2016 at 2:25 pm
Which thermal pad did you use? also, by how much (mv) did you uv? I repasted & UV’ed down to -125mv but still seeing throttling during gaming.
Douglas Black
August 19, 2016 at 2:28 pm
generic 1.5mm ones I picked up from my local mobo repair shop. I could only UV about -70 igpu and -90 CPU. More than that and the benchmarks would crash. As I mentioned in the article, – you can never get rid of the throttling during gaming with the iris 540. It would need double the TDP to run without throttling.
Umbrion
October 27, 2016 at 11:21 am
I have a Lenovo y50-70, with a 4720HQ and 960m 2Gb… I tried several things to increase performance while decreasing temperature… what worked best for me was lapping the heatsink and adding thermal padding to the top of the heat pipes. The bottom of my case is metal, so I added a thermal pad/ copper pad/ thermal pad "tower" that went from the top of my heat pipe to the bottom of the bottom caase. With the lapping and the padding, i can max out all my values to x38 and run a 1024 ts bench with furmark and not hit temps over 92 C… it was night and day for cooling when I lapped the heat sink… WELL worth it.
AnthonyT
December 19, 2016 at 1:14 pm
Wouldn't disabling Turbo Boost do the same as undervolting?
Douglas Black
December 19, 2016 at 10:30 pm
They both would reduce temperatures, but disabling turbo should be only a last resort because it lowers performance. Undervolting will reduce power consumption at all clock speeds as well as reduce temperatures. It basically has no downside.
AnthonyT
December 20, 2016 at 12:52 am
Ok so this did me wonders! I was able to achieve very low CPU Temps, and overclocking was very simple. I do have a question when it comes to over clocking.
I am running a 2016 RazerBlade gtx970m. Usually with no undervolting, the CPU runs hot, and so does the GPU about 85C when gaming. My current overclock of of +130core and +400clock gets the GPU to about 83-85C similar to stock. (obviously undervolting brings my GPU down to about 78-81C when gaming with no overclock)
Now here is my question, since my Current Overclock just brings the temps to 85c, which is what they would be without any undervolting or overclock, is it safe to leave it at that? I mean its just running the same stock temps just a cooler CPU, would there be any long term damage with my overclock set that high?
Douglas Black
December 20, 2016 at 1:05 am
Glad to hear it helped!
Overclocking the small amount available on mobile platforms is only a difference of 1C at most, because there just isn't any extra voltage given. You're probably fine up to 87C. Ultimately though, all you can do is repaste the CPU and GPU if you want to directly improve GPU temps. The only reason undervolting may help your GPU temp as it is is because the heat from the CPU overloads the cooling solution's ability to deal with the GPU heat as well.
Yanling Li
June 14, 2017 at 12:54 pm
Great guide!
Question for the author and those who have tried this: are you lowering the CPU/CPU cache separately from the iGP voltage, or doing both together?
Put another way: should I first determine the correct offset for the CPU/CPU cache, then find it for the iGP, or be doing both in tandem?
Douglas Black
June 14, 2017 at 9:56 pm
iGPU has less tolerance, so i'd undervolt it after the core/cache
Tun
July 29, 2017 at 9:37 am
Just want to say thank you for sharing this article. It is the most detailed and easy to understand guide I've come across.
My story: I have a NVIDIA Geforce GTX 950M 4GB. Originally, I can't seem to play the game Resident Evil Revelation 2 on max settings (60f@1080). Every few minutes the game becomes stuttering for a few more minutes. I reckon it's because of the GPU thermal throttle (at a surprisingly low 65C). I've followed your guide and reduced the heat when offset the CPU clock for -0.1MHz. And now I can play without any problems at all. Thanks again.
Tun
July 30, 2017 at 3:38 am
Ok, so I need some help. After 1-2 days of only undervolting (no overclock yet), the BSOD just showed up randomly 2 times when I'm running a game (only really lightweight game, not anything fancy). First time the error says something like "STORE DATA CORRUPTION" I don't remember. Second time the error says "UNEXPECTED KERNEL MODE TRAP". I'm worried that it's because of my undervolting, or is it something else? For now I've removed the ThrottleStop from my Task Scheduler. Also my laptop is newly bought, so the hardwares couldn't have a faulty problems.
Douglas Black
July 30, 2017 at 3:44 am
Sounds like you need to reduce your undervolt. What are your core/cache and iGPU undervolts? Try reducing them all by 10mv and see if it's stable again, and you can work your way back up.
Tun
July 31, 2017 at 9:58 am
Thanks, I've seen what caused the BSOD. Because the lightweight game is a Windows 10 Store App, it won't utilize the GPU but the iGPU. So apparently I've undervolted my iGPU a bit much. That's why I don't have any problem with the graphic demanding game. I can just make the game utilize the GPU. But I also want to see the undervolt limit, so I will make the change:
Here is my original values:
– CPU Core/Cache: – 100mV
– iGPU: – 80mV
Will reduce them and let you know. BTW here's my specs:
Processor Intel(R) Core(TM) i5-7200U CPU @ 2.50GHz
Video Card Intel(R) HD Graphics 620
Video Card #2 NVIDIA GeForce GTX 950M
MArcio
October 16, 2017 at 4:51 pm
when i purchased my HP Omen 16 in 2016 this was the first guide i stepped uppon and did it right away and i never commented or gave you my thanks.
Thank you for this awesome guide.
I'm running a i5 6300hq. Normally while playing games i had my temps rising from 85C to 90C which was a no-go to me until i found this.
My temps are 70-75C in a room temperature of 20-28C depending on the weather.
Now that is an awesome decrease of heat. My kaptop stays cool.
In fact, i don't even touch my laptop, it's connected on my monitor and got an external keyboard/mouse racing wheel G29, etc…
I also put 2CD covers on the back so it get dissipate the head better and have better airing overall.
In winter time i got an average of 65C-70C playing the witcher 3/MAfia 3 and online gaming battlefield 1
My UV are Core -150mv, cache -150mv, iGPU -100mv
Overclock nvidia +135 and memory +270
Now keep in mind these are totally stable while UV -160 was stable enough i've rather go -150, on the sife side so no BSOD happend while gaming.
Thanks again for all these great tips, you're the man :)
Douglas Black
October 16, 2017 at 10:56 pm
Thank you for letting me know how useful you found the guide! You are very welcome.
Samuel Mogbolu
November 17, 2017 at 7:30 am
I have downloaded throttle stop but it doesn't seem to have the FIVR button so I can't even begin the undervolting process.
Douglas Black
November 17, 2017 at 7:31 am
If your laptop is (I believe) using a 3rd generation CPU or older then it may not support undervolting.
Md aarif
September 26, 2018 at 8:05 am
Meetoo
Sevdalin
February 16, 2018 at 10:44 pm
Hello Douglas,
I want to ask, do you think this method will be suitabl for my DELL XPS 1645 (Intel i7 1st generation) (2009 model).
I'm affraid I can kill it, and right now I can't afford that.
Let me know what you think!
Thank you!
Douglas Black
February 16, 2018 at 10:46 pm
I don't believe you can undervolt that cpu, unfortunately. However, you can't cause hardware damage by undervolting to my knowledge
Jean
May 30, 2018 at 5:49 pm
Can you give me some information about what happens when we use greater multipliers?. My case, intel i7-7820HQ opens by default with 29. When i change it any higher than this, a "T" appear with the multiplier. As far as i understand from TS site, this is the way to activate turbo boost (they say, change +1, in my case 30T). furthermore, I have read in your previous post something about setting at 99% for CPU on windows power options to avoid turbo boost, are this both things related?
Best!,
Douglas Black
May 30, 2018 at 5:52 pm
Hey, the most recent version of this guide is currently published at notebookcheck: https://www.notebookcheck.net/How-to-Lower-Temperatures-Stop-Throttling-and-Increase-Battery-Life-The-ThrottleStop-Guide-2017.213140.0.html
A lot of that stuff on the left is no longer functional on new CPUs, and you can't even use windows power options since the latest Windows update removes it. What do you want to accomplish with TS?
Alberto Gomez-Flores
July 26, 2018 at 9:09 am
I followed this guide on my own 9560 and noticed that the clock speeds were all over the place, the fluctuate up and down when I look at them in MSI afterburner. They do this on idle but as soon as I launch something like blender and render something the speeds stay at 3.4ghz. Will the constant CPU clock speed fluctuation damage it in anyway, or is that how it's supposed to be. Sadly I didn't check this before changing any of the undervolt settings.
Andrei Girbea
July 26, 2018 at 5:19 pm
It's normal for the clock speeds to vary.
Rishang
March 11, 2019 at 6:52 am
What about the 4th profile?
How do you set it up
why is that only 3 profiles can be used only?
Douglas Black
March 11, 2019 at 6:54 am
You can set up 4 profiles if you want, but you can only set 1 profile for a CPU temp alarm, 1 profile for GPU temp alarm, 1 profile for battery, and 1 profile for AC. Those are the only 4 triggers for automatic switching.
Rishang
March 11, 2019 at 8:18 am
Thank you,
I have a dell XPS 9560 with i5-7300HQ, Is 55mv undervolting enough for it?
Douglas Black
March 11, 2019 at 9:19 am
"enough" is relative to what temperatures and battery life you require. I would guess you can easily UV to -110mv at least, however
rishang
March 11, 2019 at 11:20 am
Thank You
one last question tho :p
What setting (clock speed, epp etc..) is recommended in throttlestop for battery profile (4th Profile) , if I want throttlestop to work when the laptop is on battery.
The configuration should improve my battery life..
Douglas Black
March 11, 2019 at 11:32 am
I usually disable turbo and use a speedshift value of 192.
vannak
November 4, 2019 at 7:40 am
Very informative! Thanks from a beginner tech guy like me
Vonn
July 1, 2020 at 8:18 am
does this work on ROG G15?
Ryzen 7 4800HS
Because it suddenly increases its temeperatures and its too damn hot for only doing light tasks.
Andrei Girbea
July 1, 2020 at 9:53 am
No, ADM laptops don't support most of these tweaks. You can however disable CPU Boost and that might help, but will also reduce the performance
Sam Braik
September 5, 2020 at 9:06 am
great info thank you
Isaac
May 8, 2021 at 1:17 am
Hi,
I just did this test with Throttlestop and Intel Extreme Tuning Utility to test it at 100% CPU.
Now I ended my test and got a bluescreen once. Ended up setting it at -80mv for CPU and Cache, while I did -40 for the GPU.
One thing that I noticed is that my pc doesn't use much resources at all when simply browsing, watching videos etc.. Why shouldn't we also make a profile for that, to heavily undervolt that? I understand that when maximum CPU is reached, the PC/laptop should not blue screen, and then use the other profiles where CPU is decreased in order to keep a hold on the temperature. But why not do it the otherway as well?
Curious to find out, if anyone knows, please reply.
My cpu:
I5-4210U
Douglas Black
May 8, 2021 at 1:23 am
So, there's an interesting phenomenon regarding this. For whatever reason, it's more stable to heavily undervolt under load than at idle. I have experienced similar issues with eGPUs when running "power saving" profiles. Idle profiles seem to need more voltage to be stable, possibly because they're already set low.
isaac
May 9, 2021 at 1:15 pm
Hmm.. strange.
I don't think my laptop runs power saving profiles. I always have it plugged in, and the battery-saving option in the Windows 10 menu is grayed out for me. Perhaps this would mean I could make these profiles in throttlestop with even higher undervolt values, but I'm not sure so I will leave it here.
Thanks a bunch for this article. I now have a much quieter and cooler laptop.
Amazing what cleaning the vents, cleaning the OS, HDD to SSD and undervolting do to a 5-6 year old laptop. Better than new! Gonna replace the thermal paste as well.
Isaac
Isaac
May 13, 2021 at 1:18 pm
I wanted to let you know I also replaced thermal paste of my older laptop.
With undervolting it went from 70 degrees celsius to 62.
With new thermal paste I further decreased the 62 to 58.
So in a stress test I went down 12 degrees with undervolting and $10 thermal paste. Excellent.
Roose
December 6, 2021 at 7:01 am
Can I undervolt the HP Envy 14-J106TX with intel core i7 6700HQ with Nvidia GTX 950M
Douglas Black
December 6, 2021 at 6:31 pm
You should be able to, unless HP has a bios update that disabled it that was installed.
Suki
July 10, 2024 at 6:40 am
I tried Opening the FIVR window Everything is blocked for me I use the Zephyrus M16 2023 Version the CPU Core Intel GPU core and the other options windows entirely says not available